By cuterose
17 Tips to Use Health App on iPhone Like a Pro
Just as iMessage is my preferred messaging app, the Health app remains my top pick for tracking and managing health data. While the App Store is flooded with a wide range of health and fitness apps, none can match the in-depth health tracking repertoire of Apple’s offering. Though the addition of a plethora of features has made the app feature-rich and a boon (sort of) for fitness freaks, it has also increased the learning curve – especially for the newbies. If you don’t want the steep learning curve to come in the way of your desired fitness goal, check out of these 17 tips to use the Health app on iPhone like a pro.
Tips to Use Health App on iPhone Like a Pro
Apart from helping you get the most out of major Health features, this guide can also show you the right way to manage your health data. So, you can manage apps’ access to Health, keep a tab on what sort of health data an app has accessed, revoke access if needed, and even delete specific or entire recorded data whether for privacy or smart storage management.
What’s more, the guide has got a few cool hacks to let you shield your health data from the prying eyes as well. What could be a super convenient feature for many may seem to be privacy-intrusive for some. That’s why it’s always better to have the desired control over the features that are like a double-edged sword. Enough talk, let’s explore the top tips to make the most of the iPhone Health app!
A feature-rich app like Health needs to be managed smartly. Else, it will look completely cluttered and you will find it a bit inconvenient to keep a tab on the health and fitness tracking data.
Health app allows you to favorite the things that you prefer to keep an eye on. Thus, you can keep the unwanted data away and focus only on the topics that matter to you. Open Health app on your iPhone -> Summary tab -> Edit -> All tab. Now, tap on the star button to the left of each item that you wish to show on the Summary screen.
Once you have customized your favorites, make sure to tap on Done at the right corner of the screen to confirm the changes.
Undoubtedly, one of the major highlights of iOS 14 (and of course watchOS 7) was Sleep Tracking, and it’s still one of the most useful health features of the Apple Watch. Considering how pivotal a sound sleep is for health, it had been on my radar for a long time. While there is no dearth of third-party sleep tracking apps for iPhone, I always wished to have a built-in sleep tracker. And I guess, most health and fitness lovers had been asking for it as well.
Activating sleep tracking in the Health app for iOS is pretty straightforward. All you need to do to get started is navigate to the Health app -> Browse tab -> Sleep. Now, go through the simple instructions to set up sleep tracking on your iPhone and enable sleep detection on Apple Watch.
Depending on your needs, you can manage the sleep tracking data sources in the Health app on your iPhone. For instance, you can stop any source from using the sleep tracking data and even track all of its accessed data. To be more precise, it’s all about having complete control over your sleep tracking data and allow/disallow apps’/associated devices’ access to it at your own will.
Open Health app on your iPhone -> Browse tab -> Sleep -> Data Sources & Access (located at the bottom). Under Apps Allowed to Read Data, you should see the apps which you have allowed to read your sleep data. You can use the toggle right next to each app to allow/disable its access to your sleep data.
Under the Data Sources section, you should see the list of all the apps which you have allowed to update your data. You can tap on each app and check what data it has accessed. Besides, you also have the option to delete either specific or entire sleep data gathered by a respective source.
Maybe you no longer want to use the native sleep tracking feature. Maybe you wish to completely wipe out the sleep tracking data to prevent the Health app from being cluttered for space. Whatever could be your personal reason, you can delete the entire sleep tracking data to either safeguard your privacy or declutter the Health app.
To get it done, open the Health app on your iPhone -> Browse tab -> Sleep -> Show All Data (it’s at the bottom). On this screen, you will see all the recorded sleep tracking data. Now, tap on Edit at the top right corner of the screen and then either delete specific data or delete them all at once. Make sure to hit Done in the end to confirm the action.
Cycle Tracking is a notable women’s health tracking feature designed to track the menstruation cycle and fertility window. You can use it to monitor your daily symptoms and monthly activity using the Health app (or the standalone Cycle Tracking app on Apple Watch). Moreover, it also shows period fertility window predictions to help you remain in sync and plan accordingly.
To get started, head over to the Health app on your iPhone -> Browse tab -> Cycle Tracking -> Options. Now, tap on Period Length and enter your period length. Then, tap on the Cycle Length and enter the time between periods to set up Cycle Tracking on your iPhone and Apple Watch.
Once you have enabled Cycle Tracking, you can customize it depending on your needs. For instance, you can choose to include/exclude cycle log options and display logged sexual activity as well as basal body temperature.
Introduced in iOS 13, Hearing helps you avoid being exposed to a high level of sounds. Apple has further enhanced it in iOS 14 by adding the ability to check the headphone audio level in real-time on your iPhone.
For those uninitiated, 85 decibels is the highest safe exposure level up to a maximum of 8 hours, while 100 dB sound is considered to be safe for just 15 minutes a day. In other words, safe listening time decreases as the sound level increases, so be sure to keep a track of the headphone audio level to protect your hearing.
Bear in mind that only Apple-certified headsets and AirPods are able to deliver more accurate results. To get started, go to the Settings app -> Control Center. Now, find Hearing and tap on the “+” button to the left of it.
Going forward, you can track the headphone audio level from the Control Center. If you see a green tick, the volume level is OK. However, if the measurement shows a yellow exclamation mark, the volume level is above the 80-decibel level which is harmful to your ears.
The Health app offers a detailed insight into the headphone audio levels. Hence, you can understand how long you are exposed to loud audio. To get it done, go to the Health app -> Browse tab -> Hearing. Now, check out the headphone audio levels of the past 7 days and the environmental sound levels.

The newly-launched cardio fitness feature (introduced in watchOS 7.2 and iOS 14.3) allows you to keep a track of your cardio fitness levels through VO2 max measurements. VO2 max is considered to be the maximum amount of oxygen that the body can use during exercise, which you can boost through physical activity.
It’s worth pointing out that before the introduction of watchOS 7.2, Apple Watch could only estimate higher levels of VO2 max with outdoor runs, hikes, or walks. However, with the arrival of the cardio fitness levels, the smartwatch can now take cardio fitness measurements as you walk throughout the day. Notably, it measures cardio fitness levels as High, Above Average, Below Average, or Low.
To get started, open Health app -> Browse tab -> Heart -> Cardio Fitness -> Set Up. Now, follow the instructions to set it up perfectly.
There is no denying the fact that Emergency SOS is a life-saving feature, so you shouldn’t fail to get the most out of it. Once activated, it not only calls the emergency services department but also alerts your dear ones so that they can reach out to you without any delay. Better still, Apple lets you add/remove emergency contacts to your iPhone with ease.
To do so, open the Health app -> your profile -> Medical ID -> Edit -> add emergency contact. Now, select the contact and then add the relationship. In the end, be sure to tap on Done at the top corner of the screen.
Don’t get me wrong! There is a valid reason why Apple allows the Medical ID to be accessed right from the lock screen. Times when you need immediate help, a person can check your Medical ID to find your emergency contacts and reach out to them. Considering how important it is to contact the emergency services department or relatives as soon as possible in an emergency, this feature can prove to be a life-saver.
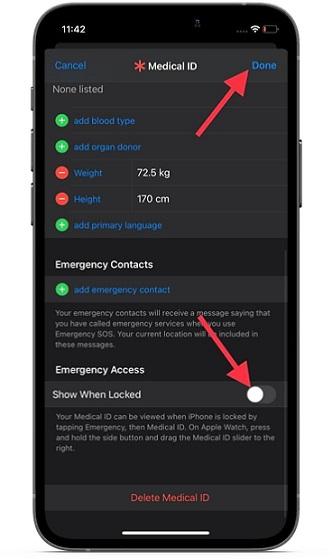
But what if you wish to keep your personal information private or simply don’t want anyone to check your Medical ID without your permission. No problem, you have the option to hide the Medical ID from the lock screen. To do so, open the Settings app on your iPhone -> Health -> Medical ID -> Edit. Now, turn off the toggle right next to Show When Locked. Then, tap on Done at the top right to finish.
With the bedtime alert, you are reminded of your commitment to sleep at the preferred time so that you can achieve your sleep goal. While I appreciate this feature, it does tend to appear a bit annoying when you no longer need a sleep reminder or for that have got used to the routine. Thankfully, there is a way to turn off the bedtime reminder on your iPhone.
In iOS 14 or later, Apple has slightly tweaked the process of turning off/on bedtime reminders. For a change, the bedtime tab has been removed from the Clock app and a sleep reminders toggle has been included deep into the Health. Yeah, the new process is a bit confusing. But, you need to learn how it works in order to take control of the bedtime reminders.
Go to Health app -> Browse tab -> Sleep -> Options (located all the way to the bottom). Now, turn off/on the Sleep Reminders toggle as per your needs.
Siri keeps a tab on how you use the Health app and offers suggestions accordingly on the home screen, in search, and look up. While this feature is quite helpful, some privacy-conscious users may want to hide Siri Suggestions from the Health app.
If you are one of them, go to the Settings app on your iPhone -> Health -> Siri & Search. Under the On Home Screen section, turn off the toggles right next to options like Suggest App, Show App in Search, Show Content in Search, and Show Suggestions from App. Then, quit the Settings.
Another feature that many privacy-conscious iPhone users would like to check off is the option to hide Siri Health suggestions on the home screen. To a large extent, I’m fine with Siri’s personalized suggestions from Health on the home screen. However, I prefer to keep them away from the lock screen.
Navigate to the Settings app on your iPhone -> Health -> Siri & Search. Under the Lock Screen section, turn off the switch right next to Show Suggestions from App.
Health app offers a complete health checklist that helps you keep an eye on the health features you have enabled on your iPhone. Moreover, it also recommends you activate the features that can further boost your health and fitness. So, if you ever want to see your health checklist to figure out the features that you have enabled and the ones you should set up to improve your fitness, navigate to Health app -> your profile -> Health Checklist.
On this screen, you should see the health features that are active. Under the Inactive section, you will find all the features that you should enable. Pretty neat, isn’t it?
In a typical Apple fashion, the Health app offers you the desired control over apps’ access (both first and third-party) to your health data. So, you can keep a track of what sort of health data each app has accessed and even delete all the recorded data as and when you want, depending on what works best for your personalized health and fitness tracking.
Launch Health app on your iPhone -> Profile -> Apps. Now, you would be presented with a list of all the apps that have access to your Health data. Next, you can check what data each app has accessed and choose to delete all the recorded data if you no longer need it.
Probably the best part about iCloud backup is that it automatically includes important data like your health. Thus, you don’t have to worry about losing your progress report in case of any hazards. Before enabling the iCloud backup on your iPhone, make sure the toggle right next to Health app is turned on (Settings app on your iPhone-> Profile -> iCloud -> Health).
Since iCloud offers just 5GB of free cloud storage, some users might want to stop the Health app from storing its data in the cloud just to manage the limited cloud storage. If that’s you, disable the Health toggle.
Unlike iCloud backup, the iTunes/Finder backup doesn’t include your Health data by default. So, how do you include it in your backup so that you won’t lose your progress? Well, you need to encrypt your iPhone backup. Aside from including essential information like Health and Wi-Fi settings, and call history, the encrypted backup also prevents unauthorized access to your data.
To get going, connect your iPhone to your computer. Then, launch iTunes or Finder (in macOS Catalina or later) -> select your device. Now, check the box to the left of Encrypt local backup. After that, enter the password to protect your device backup and hit the Set Password option. Next, click on the Back Up Now option to start the backup process.
Health offers a straightforward way to export your entire health data. So, if you ever wish to export your Health data to other health and fitness apps or store it somewhere for a keepsake, you can do so with ease.
Keep in mind that exporting Health data from iPhone results in a zip archive which consists of raw data in XML format. The exported health data contains information gathered by the Health app and any associated devices. For instance, it will include your Medical ID data, distance tracker data, the native iPhone step counter, and the data gathered from the paired Apple Watch, as well as third-party devices like smart scale or blood pressure monitor.
Open Health app on your iPhone -> your profile -> Export All Health Data. Then, go through the instruction to export your health data.
Tips to Get the Most Out of Health App on iPhone
That’s pretty much it! I guess you can now unlock the full potential of the Health app on your iPhone. Now that you have got a good hang of the major health and fitness features, make the most of the tips to get fitter and stronger. Remember, it’s never too late to start something on the right note. Oh yes, do not forget to let me know about any nifty Health features that may be missing from this guide in the comments down below.
Related Articles

What devices work with Apple Fitness Plus? Here's what's compatible with Apple's workout app
Amazon Halo Review: The Fitness Gadget We Don’t Deserve or Need
Redmi Watch 2 Lite with over 100 fitness modes, heart rate tracker launched for Rs 4,999
Fitbit Sense review: A premium wearable that rivals the likes of Apple and Samsung Register for free to continue reading


