By cuterose
How to connect Bluetooth headphones
Bluetooth headphones connect to a whole bunch of devices but the settings can be a bit hard to find and are fiddly to work with. This guide will show you how to pair your headphones with almost any device you can think of, including workarounds if they don't have built-in Bluetooth support.
This is a broad overview that covers the general steps involved for each device. As we aren't able to connect every brand and model of headphones to every laptop, phone and console to confirm that these work in all instances, use this as a starting point and consult your instructions manual if you're still having trouble.
On this page:
Enabling Bluetooth on your headphones
Before you do anything else, figure out how to activate Bluetooth pairing on your headphones. You might need to look for steps like Bluetooth pairing, syncing, or scanning in the instructions manual.
This usually involves holding down a dedicated Bluetooth button or pressing your finger against the touchpad for a few seconds to activate it. The headphones should beep or say something like "pairing" during this process. These steps from Sony are a good example.
The headphones and device you want to connect to need to be in pairing mode at the same time. Don't activate it on your headphones until the other device is scanning.
Using a Bluetooth adapter
Also known as dongles, Bluetooth adapters are basically the universal solution for adding Bluetooth connectivity to devices that don't support it. Most connect to your TV, computer or gaming console via USB-A or USB-C but some also use audio connectors such as 3.5mm AUX, RC (red and white cables) or optical (aka TOSLINK).
All you need to do is plug it in, change the settings in your device to send audio out via the connection port (e.g. USB, optical) and then connect the headphones to the dongle. Like headphones, all dongles do things differently so check the instructions on how to set up pairing.
Although these are a widely supported workaround, dongles can cause some issues. Cheap models may reduce audio quality and they usually have lip sync delays.
Bluetooth adapters/dongles can help you retrofit wireless connectivity to many devices.
Connecting headphones to an iPhone or iPad
Apple's iOS operating system is pretty straightforward. All you need to do is click the settings cog, then select Bluetooth and turn it on. Your iPhone/iPad will immediately start scanning for nearby devices. Tap your headphones when they appear in the list and they'll connect.
Your headphones should automatically connect from here on out. If they don't, open the Bluetooth settings and select them from the My devices list. Any calling capabilities supported by the headphones should also automatically activate.
Removing headphones
If you're getting rid of your headphones and don't want them cluttering up your device list, tap the "i" icon next to the name then tap Forget this device.
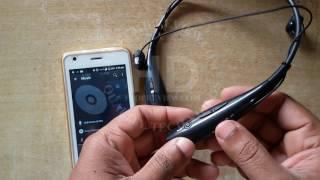
Connecting headphones to an Android smartphone or tablet
Android devices can be a bit tricky, as manufacturers can alter the appearance and layout of the operating system. Fortunately, the settings include a search function which makes it easy to locate the Bluetooth options.
Go to Settings, search Bluetooth, and tap the top result and turn it on. Next, select Pair new device to activate Bluetooth scanning, then pick your headphones from the list. Any calling capabilities supported by the headphones should also automatically activate.
Like iOS, previously connected headphones will automatically reconnect. But if that doesn't work, go back to Settings and select them from the list of Previously connected devices.
Removing headphones
To remove headphones from your device list, tap the cog icon next to their name followed by Forget with the garbage can icon.
Connecting headphones to a Windows computer
Setting things up on Windows 8.1 and Windows 10 is pretty straightforward. Older versions of operating systems such as Windows XP, Vista and 7 are no longer supported by Microsoft so they won't be covered here.

Move your mouse to the right side of the screen to bring up the charms bar, then click the settings cog. Click Change PC settings at the bottom of the pop-up menu, followed by PC and devices, then Bluetooth. Turn it on and your PC will start scanning for nearby devices with a list of previously connected devices below.
When your headphones appear, click Pair and wait for them to connect. You can double check this by right-clicking the volume icon, the selecting Playback devices. Find your headphones in the list, click them then click Set default. This will ensure that your computer defaults to the headphones when Bluetooth audio is turned on.
Windows 8.1 via USB dongle
First, connect your headphones to the dongle as normal. Next, plug in the USB dongle, then right-click the speaker icon in the bottom right corner of the screen and select Playback devices. Pick the option that corresponds to the USB input, click Set default then Apply.
Go to Settings > Devices > Bluetooth & other devices and turn on Bluetooth. Next, click Add Bluetooth or other device and select Bluetooth. The PC will enter Bluetooth scanning mode. Now set your headphones to Bluetooth pairing mode and they should appear in the list of available devices. You may see some additional audio settings which you can adjust. After that, click Done.
Windows 10 via USB dongle
First, connect your headphones to the dongle as normal. Next, plug in the USB dongle, then click the speaker icon in the bottom right corner of the screen to open the audio device pop-up menu. Click the arrow in the top right corner to open the list of available devices, then select the option that has USB in the name.
Connecting headphones to a MacOS computer
Apple makes this process very easy and the good news is pretty much every Mac released in the last decade includes Bluetooth support. First, click the Apple icon in the top left to open the Apple menu and go to System preferences... > Bluetooth. Then turn on your headphones' scanning mode and they will appear in the computer's list of devices. Click it to connect.
You may also need to additionally click Accept or a series of numbers on the screen or located in the instruction manual to help the computer identify the headphones.
Connecting headphones to a TV
Most television manufacturers have only recently added Bluetooth audio support and the set-up process varies not just between brands, but between the operating system in use and sometimes even the version of the operating system.
Though we've done our best to cover the steps for each brand in our TVs test, they may be slightly different depending on the model of your TV. Still, they should at least point you in the right direction. If you can't find the Bluetooth settings at all then chances are your TV doesn't support it.
Bluetooth-enabled Sony TVs date back to 2017 and Sony has a list of supported models as well as compatible headphones.Though the company only offers official support for its headphones, the website notes other brands may work if they support A2DP Bluetooth. Check the specifications to see if your headphones support this version.
To turn it on, press Home on the remote then open the Settings (cog icon) and scroll down to Network & accessories. Here, select Bluetooth, turn it on then Add device to activate pairing mode on the TV. Tell your headphones to start scanning and the brand and mode will appear in the top right corner of the TV once connected. They will automatically reconnect the next time you turn on the TV. Remember to turn off Bluetooth if you don't want to use the headphones.
Open the full settings menu by either pressing the cog button on your remote to open the quick settings then scrolling down to All settings, or holding down the cog button for a couple of seconds. Scroll down to Sound, select Sound out then Bluetooth. Next tap Bluetooth device list. The TV will start scanning for nearby Bluetooth devices so turn on pairing mode in your headphones and select them in the list when they pop up.
After that, the TV will save them as a device so they should automatically reconnect whenever you turn on Bluetooth. If not, you can select them from the list.
Note: This won't work if the TV is set to output audio via HDMI ARC, eARC or Optical.
Samsung has been making TVs with Bluetooth support since 2014 but it isn't available on every model. If your TV has Bluetooth and was made during or after 2017, you can turn it on by going to Home > Settings > Sound > Sound output > Bluetooth speaker list. If you have an older TV, you can find the path to the settings here.
Turn Bluetooth on to start the scan, followed by pairing mode on your headphones. When they appear in the list of devices on the TV, select them to connect.
Bluetooth isn't available on all Hisense TVs, but you can check by opening the TV Menu then going to Settings > Network. There should be a Bluetooth option here which you can turn on. If not, then your Hisense doesn't support Bluetooth. Once it's turned on, the TV will automatically detect nearby devices that are in pairing mode. When your headphones pop up, select them from the list.
First, press the Home button on your remote and then scroll down to the Settings (cog icon). Then go to Remote and accessories > Add accessory, put your headphones into pairing mode and select them when they appear in the device list on the TV.
A Bluetooth adaptor or dongle is the best solution if your TV doesn't support Bluetooth. However, you'll need to find one with RCA or optical connectivity, as USB audio output isn't available on most TVs.
Once you've plugged it in, you need to navigate to your TV's audio settings and change the audio output to the option that the dongle is connected to. After that, pair your headphones with the dongle as per the instructions and you're ready to go.
Note: The TV won't automatically switch to other outputs, such as a soundbar or the built-in speakers, if you don't want to use your Bluetooth headphones. You'll need to go back to the audio output settings and manually switch between the options every time.
Connecting headphones to gaming consoles
This is rather complicated as most gaming consoles don't support Bluetooth connectivity for audio devices. This is partly because Bluetooth interferes with the wireless controllers. Although you can get wireless headphones that are compatible with consoles, there are some workarounds that may allow you to connect your standard Bluetooth headphones.
Note: These methods can reduce audio quality and may cause issues with the microphone during in-game chat. Some don't let you use the microphone at all.
Though the PS4 does have Bluetooth, it only supports some wireless headphones. These are usually listed under "PS4 supported" or "PS4 headsets" at retailers, and it's noted in the specifications as well so keep this in mind before buying.
To connect your headphones, go to Settings > Devices > Bluetooth devices then put your headphones into pairing mode and select them from the list. If they don't appear, reset the console and try again. If they don't appear after that, then your headphones don't have PS4 support.
You can try using a USB dongle in this instance. Plug the dongle into your PS4, pair it with your headphones, then go to Settings > Devices > Audio devices > Output devices then USB headset. Next, scroll down to Output to headphones and select All audio.
The PS5 doesn't support Bluetooth audio at all which means the dongle is your only option. Plug it in, pair your headphones, then go to Sound > Microphone then set Input device to USB headset. Next, go down to Audio output and set Output device to USB headset.
The latest iterations of the Xbox don't support Bluetooth or USB audio. Instead, Microsoft uses a proprietary wireless system that's supported in a handful of headphones which retailers sell as "Xbox compatible".
That said, you can get 3.5mm Bluetooth adaptors that do the same thing as a USB dongle. This is the only workaround if you really want to connect Bluetooth headphones that aren't officially supported. All you need to do is plug it in, pair it with your headphones and the Xbox will automatically output audio through the 3.5mm jack.
Nintendo added Bluetooth audio support to the switch with version 13.0.0, so make sure your unit is up to date otherwise this won't work. After that, go to Settings > Bluetooth audio > Pair device. Next, put your headphones into pairing mode and select them when they appear in the list.
After that, the headphones should automatically pair whenever they're turned on and within range of the Switch. It can save up to 10 pairs of headphones.
Dealing with latency
Latency, also often referred to as lag, is when audio and video don't sync up correctly. It's a problem with wireless audio of any kind that has improved somewhat over the years but still persists today.
Some headphones claim to automatically adjust for latency, while other devices compensate for it either automatically or with small tweaks that you can manually enter in milliseconds. These settings vary depending on the brand and product, so check the instructions manual for the headphones and device they're connected to for any information regarding latency or lip sync. If none of these tools are available then there's nothing else you can do.
We care about accuracy. See something that's not quite right in this article? Let us know or read more about fact-checking at CHOICEJoin the conversation
To share your thoughts or ask a question, visit the CHOICE Community forum.
Visit CHOICE CommunityRelated Articles

Create Labels Easily Using Excel-No More Mistakes!
8 Tips To Check Phone Features Before Buying
What Chargers Can MacBook Use?
How to Connect a Laptop to a TV Screen: Full Guide


